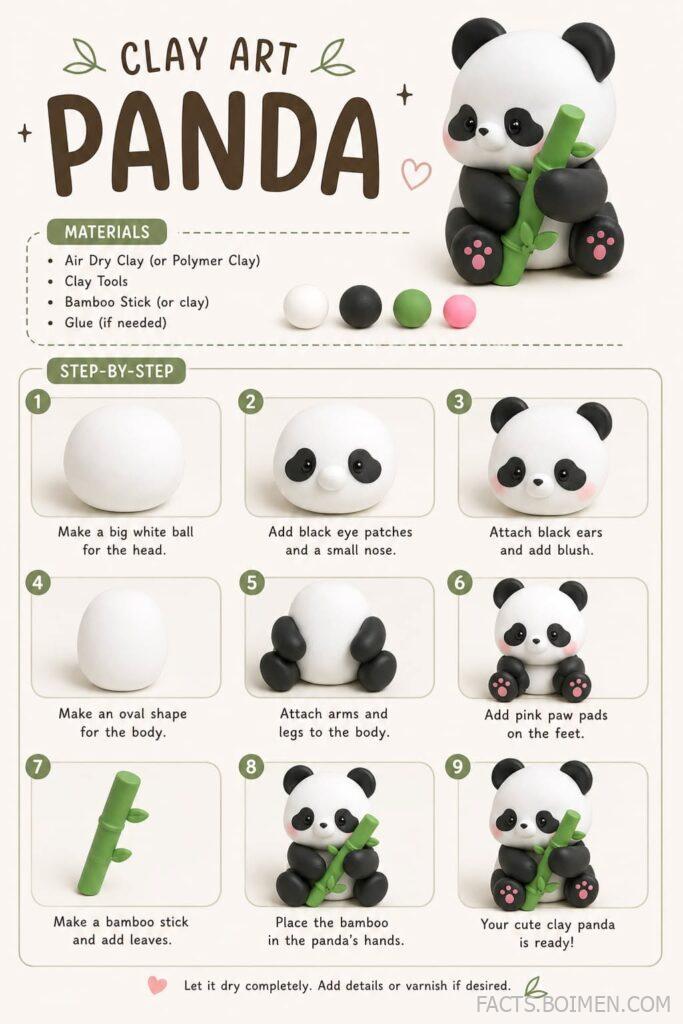
Want to craft an adorable clay panda that actually looks like a panda? This step-by-step tutorial shares the exact techniques I've refined over 50+ panda sculptures, from choosing the right clay to perfecting those iconic black eye patches. You'll go from a lump of clay to a charming panda in about 30 minutes, with no sculpting experience required.
- Start with polymer clay for easy reworking and precise details
- Use your palms to roll perfect spheres for the head and body
- Angle the eye patches slightly inward for a cuter expression
- Smooth seams with water or alcohol before baking
- Keep ears about 1/4 the head size for chibi proportions
- Add a tiny pink blush for extra charm
Choosing the Right Clay: Polymer vs. Air-Dry
For beginners, I recommend polymer clay like Sculpey III or Fimo Soft because it stays pliable until baked, allowing you to refine details without rushing. It also holds crisp edges, which is crucial for the panda's distinct markings. Air-dry clay (like DAS or Creative Paperclay) is cheaper and doesn't need an oven, but it dries faster and can crack if you work too slowly. If you're a total newbie, start with polymer—you can redo mistakes before baking.
Essential Tools: What You Really Need
You don't need a fancy kit. Grab a toothpick (for detailing), a small rolling pin or smooth bottle, a craft knife, and a clean work surface. For shaping the panda's round head and body, your palms are the best tools—roll clay into balls between your palms to get perfectly smooth spheres. A needle tool helps create the eye patches' shape, but a toothpick works just as well. Avoid using metal tools that might leave scratch marks on soft clay.
Mastering the Panda's Iconic Eye Patches
The eye patches make or break your panda. Instead of freehanding elongated ovals, roll two small black clay balls, flatten them slightly, then shape them into teardrops with a toothpick. Position them slightly angled toward the center of the face—about 1/8 inch apart from the nose. This subtle angle gives the panda a cute, expressive look. A common mistake is placing them too far apart or too low, which makes the panda look surprised or grumpy. Aim for the patches to overlap the top of the eye whites slightly.
The Secret to a Smooth, Seamless Finish
Visible seams and fingerprints ruin the cuteness. To avoid this, always smooth the clay surface with your fingertip dipped in a bit of water (for air-dry) or rubbing alcohol (for polymer). For polymer, after assembling, gently roll the whole panda between your palms to blend the neck and body seam. For air-dry, use a soft brush dipped in water to smooth joints. A pro tip: work in a cool room—warm clay gets sticky and picks up lint.
Baking and Curing: Get It Right the First Time
Polymer clay must be baked at the exact temperature on the package—usually 275°F (135°C) for 15 minutes per 1/4 inch of thickness. Use an oven thermometer; home ovens often run hot, and even 10 degrees over can burn the clay, causing brown spots and fumes. For air-dry clay, let it dry at room temperature for 24-48 hours—never microwave or oven-dry, as it can crack. Place your panda on a ceramic tile or parchment paper to avoid shiny marks.
Adding Personality: Tiny Details That Make It Yours
Once the base panda is formed, add a tiny pink blush on the cheeks (a dot of pink clay blended with a toothpick), a small white belly patch, and little black ears with a pinch of white inside. For a playful touch, give your panda a bamboo leaf or a tiny heart. These details take less than 5 minutes but elevate the cuteness factor tenfold. Remember to keep proportions: ears should be about 1/4 the size of the head, and the body should be 1.5 times the head height for a chibi look.
Finishing Touches: Sealing and Displaying
To protect your panda from dust and scratches, apply a clear sealer. For polymer, use a gloss or matte varnish like Varathane. For air-dry, use a water-based sealer. One coat is enough; let it dry completely. Then display your panda on a shelf, keychain, or magnet. Avoid using oil-based sealers on air-dry clay—they can yellow over time. Also, don't bake polymer with a sealer already applied—it will bubble.
The Hacks, Step by Step
- 1Roll the head and body
Roll a 1.5-inch white clay ball for the head and a 1-inch ball for the body. Place the body on a flat surface, then gently press the head on top—no need to score if clay is soft. - 2Attach ears
Roll two tiny black balls (about 1/4 inch), flatten slightly, and press onto the top of the head, slightly to the sides. Use a toothpick to blend the edges. - 3Shape the eye patches
Roll two small black teardrops, flatten them, and place them on the face, angled toward the center. Leave a small gap for the nose. - 4Add eye whites and pupils
Press two tiny white balls onto the bottom half of the patches, then add smaller black pupils on top. This creates the classic 'cute' look. - 5Sculpt the nose and mouth
Roll a tiny black oval for the nose and place it just below the eye patches. Use a toothpick to draw a small 'Y' shape for the mouth. - 6Attach arms and legs
Roll four small black sausages for limbs. Press them onto the body, curving the arms slightly upward to look like a hug. - 7Smooth and refine
Dip your finger in water (or alcohol for polymer) and gently smooth all seams and fingerprints. Check the face for symmetry from all angles. - 8Bake or air-dry
Follow the clay's instructions. For polymer, bake at 275°F for 15-20 minutes; for air-dry, leave for 24-48 hours. Then seal if desired.
The magic of a cute panda is in the eye patches—angle them inward just a few degrees and the whole face transforms.
Frequently Asked Questions
What clay is best for beginners making clay panda?
Polymer clay is best because it stays soft until baked, giving you unlimited time to fix mistakes. Air-dry clay works too but dries faster and can crack.
How do you make clay panda eye patches look natural?
Shape them as teardrops and angle them slightly toward the center of the face. Place them so they overlap the top of the eye whites for a cute expression.
Can I use air-dry clay for this panda tutorial?
Yes, but work quickly and keep a spray bottle of water handy to keep the clay moist. Expect 24-48 hours drying time.
How long does it take to make a clay panda?
Once you have the technique down, it takes about 20-30 minutes to shape, plus baking or drying time.
How do I prevent fingerprints on my clay panda?
Smooth the surface with a fingertip dipped in water (air-dry) or rubbing alcohol (polymer). Work in a cool room to avoid sticky clay.