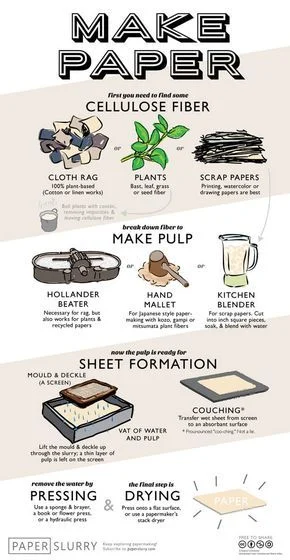
Hand papermaking looks like magic the first time you see it: a vat of cloudy pulp, a screen dipped under the surface, and a wet sheet lifted out that dries into real paper. The pin you clicked promised the full arc — fiber, pulp, slurry, sheet formation — and that is exactly what this list delivers. Below are 19 techniques, tools, and traditions that take you from raw plant fiber to a finished sheet you can write on, print on, or bind into a book. Some are ancient, some are surprisingly modern, and all of them are beginner-accessible with a little patience and a kitchen sink.
Table of Contents(Click to Toggle)
- Why Hand Papermaking Deserves a Place on Your Craft Table
- 19 Techniques and Tools for Turning Pulp Into Paper
- 1. Arnold Grummer’s Papermill
- 2. Blender Pulping
- 3. Mould and Deckle
- 4. Cotton Linter Pulp
- 5. Recycled Office Paper Pulp
- 6. Abaca Fiber
- 7. Kozo Mulberry Bast
- 8. Beating and Hollander Beaters
- 9. Sizing With Gelatin or Methylcellulose
- 10. Couching Onto Felts
- 11. Pressing and Water Removal
- 12. Drying Boards and Restraint Drying
- 13. Inclusions: Petals, Threads, Seeds
- 14. Pigment and Natural Dye Coloration
- 15. Embossing and Watermarks
- 16. Paper Laminating and Layering
- 17. Seed Paper and Plantable Sheets
- 18. Pulp Painting
- 19. Japanese Nagashizuki Sheet Formation
- Bonus Mentions
- The Quiet Joy of a Sheet You Made Yourself
Why Hand Papermaking Deserves a Place on Your Craft Table
Most craft hobbies ask you to buy materials. Papermaking asks you to understand one. Once you grasp that paper is just plant fiber suspended in water, drained on a screen, and dried under pressure, a whole world opens up: junk mail becomes pulp, garden prunings become fiber, and a blender becomes a workshop tool. The process is also unusually forgiving. A lumpy first sheet still dries into something usable, and every subsequent batch teaches you one variable — fiber length, water ratio, pressing pressure — so progress is visible within an afternoon. That combination of low cost, fast feedback, and near-infinite variation is why papermakers tend to stay papermakers for decades.
19 Techniques and Tools for Turning Pulp Into Paper
1. Arnold Grummer’s Papermill : The classic beginner kit that turns scrap paper into sheets
What it is: A compact papermaking kit built around a hand-cranked press, a mould and deckle, and absorbent couching sheets, designed for kitchen-table use.
Category: Starter equipment
Why it stands out: It removes the two biggest beginner obstacles at once — pressing pressure and sheet transfer — by including purpose-made tools sized for small batches. The included instructions walk through recycling junk mail into pulp, which means your first session costs nothing beyond the kit.
Best for: Absolute beginners and gift-makers who want a finished, writable sheet on day one.
2. Blender Pulping : The fastest route from scrap paper to usable slurry
What it is: Using a standard kitchen blender to break soaked paper into individual fibers suspended in water.
Category: Core technique
Why it stands out: A blender produces a smooth, even pulp in under a minute, which is ideal for recycled office paper and cotton linter. The trade-off is fiber shortening — blades cut fibers rather than fray them, so blender pulp makes softer, weaker sheets than a proper beater. Dedicate a secondhand blender to the craft, since paper pulp is not something you want in your smoothie.
Best for: Fast recycled-paper batches and testing color ideas before committing to a larger run.
3. Mould and Deckle : The frame pair that defines every sheet’s shape
What it is: A screen-bottomed frame (the mould) paired with a borderless frame (the deckle) that sits on top to contain the pulp.
Category: Core equipment
Why it stands out: This is the tool that literally forms the sheet. The deckle controls the wet edge, and the mesh size determines how much fiber passes through. Wooden moulds are traditional; PVC and 3D-printed versions are cheap and dry faster. Sheet size is baked in, so choose a mould slightly larger than the largest print or card you plan to make.
Best for: Anyone past their first batch who wants consistent, repeatable sheet dimensions.
4. Cotton Linter Pulp : A soft, bright base fiber for archival-quality sheets
What it is: Short cotton fibers sold dry or pre-hydrated, derived from the fuzz left on cottonseed after ginning.
Category: Fiber
Why it stands out: Cotton linter is the standard fiber for conservation and printmaking papers because it is strong, pH-neutral, and naturally bright without bleaching. It hydrates quickly and blends beautifully with other fibers. The limitation is cost — it is pricier per sheet than recycled paper — so many makers use it as a top layer over a cheaper base.
Best for: Bookbinding, letterpress, and any project where the paper needs to last.
5. Recycled Office Paper Pulp : Free fiber hiding in your recycling bin
What it is: Shredded and soaked printer paper, junk mail, or newspaper turned into slurry.
Category: Fiber
Why it stands out: It is free, abundant, and already sized, so sheets accept ink reasonably well. The catch is that most office paper contains fillers and short fibers, giving a slightly gray, weaker sheet. Sorting by color lets you build a palette — white envelopes, kraft mailers, and colored flyers each behave differently. Remove glossy coated stock, which clumps and never fully breaks down.
Best for: Practice batches, sketch paper, and teaching kids the process without waste.
6. Abaca Fiber : Long, strong fibers for thin and translucent sheets
What it is: Fiber from the abaca plant, a banana relative grown in the Philippines, sold as dry sheets or beaten half-stuff.
Category: Fiber
Why it stands out: Abaca’s long fibers shrink dramatically on drying, which pulls the sheet taut and produces the crisp, slightly translucent look prized in lampshades and fine stationery. It tolerates very thin pulls without tearing. It does need real beating to separate properly, so pair it with a Hollander beater or buy pre-beaten pulp.
Best for: Lightweight sheets, lampshades, and anything needing high wet strength.
7. Kozo Mulberry Bast : The backbone of Japanese washi
What it is: Inner bark fiber from the paper mulberry tree, harvested, steamed, and scraped by hand in traditional washi production.
Category: Fiber
Why it stands out: Kozo fibers are long, tough, and produce paper with remarkable fold strength — a washi sheet can be crumpled and smoothed back out. Preparing raw kozo involves soaking, scraping, and cooking with soda ash, which is labor-intensive but deeply satisfying. Pre-cleaned kozo is widely available for makers who want the fiber without the harvest work.
Best for: Washi enthusiasts, book conservators, and makers chasing maximum strength per gram.
8. Beating and Hollander Beaters : Fraying fiber instead of cutting it
What it is: Mechanical processing that hydrates and fibrillates fibers, increasing their surface area and bonding potential.
Category: Processing
Why it stands out: Beating is the single biggest quality upgrade available to a home papermaker. Light beating gives a porous, absorbent sheet; long beating produces a dense, nearly translucent one from the same fiber. A Hollander beater is a serious investment in money and space, so many makers rent time on a shared machine or buy pre-beaten half-stuff.
Best for: Makers who have outgrown blender pulp and want control over sheet density.
9. Sizing With Gelatin or Methylcellulose : Making paper behave like writing paper
What it is: Adding a binder — internal or surface — that reduces absorbency so ink sits on the sheet instead of bleeding through.
Category: Finishing
Why it stands out: Unsized handmade paper is wonderfully thirsty, which is charming for watercolor washes and terrible for fountain pens. A light gelatin dip or a methylcellulose spray gives a crisp writing surface without plastic coatings. Internal sizing added to the vat is more even but affects drainage, so test small batches first.
Best for: Calligraphers, letterpress printers, and anyone frustrated by feathering ink.
10. Couching Onto Felts : The transfer step that saves your wet sheet
What it is: Rolling a freshly formed, dripping sheet off the mould onto a damp felt or wool blanket.
Category: Core technique
Why it stands out: Couching is where most first attempts fail — the sheet folds, tears, or sticks. The fix is a properly damp, lint-free felt and a single confident rocking motion rather than a lift. Stacking alternating sheets and felts builds a “post” ready for pressing. Synthetic felts dry faster and resist mold; wool felts give a softer surface texture.
Best for: Every papermaker, every session — this is the step that separates success from pulp soup.
11. Pressing and Water Removal : Where sheet density is decided
What it is: Compressing the stacked post of felts and sheets to squeeze out water and consolidate fibers.
Category: Core technique
Why it stands out: Pressure controls density more than any other step. Light pressure leaves an airy, textured sheet; heavy, prolonged pressing yields a smooth, hard surface closer to Bristol board. A screw press is ideal, but a stack of heavy books and a cutting board works surprisingly well for small batches — just change the felts halfway through.
Best for: Makers dialing in surface texture for drawing, printing, or binding.
12. Drying Boards and Restraint Drying : Keeping sheets flat while they dry
What it is: Drying wet sheets against a flat board, glass, or screen so they shrink evenly and stay flat.
Category: Finishing
Why it stands out: Fibers shrink as they dry, and an unrestrained sheet curls into a potato chip. Restraint drying — brushing a sheet onto glass or pressing it between boards — trades some surface texture for a perfectly flat result. Air-drying on a screen gives a softer, more organic finish. Humidity matters: a humid room slows drying and can encourage mold on thick posts.
Best for: Anyone whose paper needs to feed through a printer or be cut into precise cards.
13. Inclusions: Petals, Threads, Seeds : Making each sheet visibly one of a kind
What it is: Embedding dried botanicals, silk threads, glitter, or confetti into the wet sheet before pressing.
Category: Decoration
Why it stands out: Inclusions are the fastest way to make handmade paper look handmade. Dried petals and pressed leaves sit best when added after the sheet is couched, so they do not clog the mould. Thick or woody inclusions can create weak spots that tear during folding, so keep them small and sparse for anything structural.
Best for: Wedding stationery, journal covers, and gift tags where texture is the point.
14. Pigment and Natural Dye Coloration : Color that comes from the vat, not the surface
What it is: Adding papermaking pigment or natural dyes to the pulp so color runs through the entire sheet.
Category: Decoration
Why it stands out: Vat dyeing means the color survives tearing, cutting, and folding — a huge advantage over surface painting. Pigments are concentrated and go a long way; a few drops color an entire blender batch. Natural dyes from onion skins, madder, or walnut hulls give softer, shifting tones and pair beautifully with kozo and abaca.
Best for: Color-coded projects, layered artwork, and anyone who loves a muted natural palette.
15. Embossing and Watermarks : Details you can feel with a fingertip
What it is: Pressing a relief shape or a wire motif into the wet sheet so the mark becomes part of the paper.
Category: Finishing
Why it stands out: A watermark is created by a raised wire design sewn onto the mould; fiber settles thinner there, so the image appears lighter when held to light. Embossing uses a textured surface under the wet sheet during pressing. Both require the sheet to be wet enough to take the impression but set enough not to blur — a narrow window worth practicing.
Best for: Personal stationery, editioned prints, and anyone who loves hidden details.
16. Paper Laminating and Layering : Building thickness and pattern in one pull
What it is: Pulling two or more thin sheets of different colors or fibers and pressing them together while wet.
Category: Advanced technique
Why it stands out: Layering lets you build a thick sheet with visible strata — a dark base under a translucent abaca top, for example — that no single vat could produce. The bond is strong because fibers interlock across the interface. The risk is uneven shrinkage between layers, which can cause curling; press firmly and dry under restraint.
Best for: Book covers, business cards, and sculptural paper objects.
17. Seed Paper and Plantable Sheets : Paper that keeps going after you are done with it
What it is: Handmade paper embedded with seeds that can be torn up, planted, and watered.
Category: Specialty paper
Why it stands out: Seed paper turns a greeting card into a small garden. The technique matters: seeds must be added after pulping and never blended, and the sheet must dry at room temperature so the seeds stay viable. Use small, fast-germinating seeds and a fiber mix that breaks down readily in soil.
Best for: Eco-friendly invitations, party favors, and classroom projects with a payoff.
18. Pulp Painting : Drawing with fiber instead of pigment
What it is: Applying colored, beaten pulp directly onto a wet base sheet through a squeeze bottle or brush.
Category: Artistic technique
Why it stands out: Pulp painting produces images made of paper itself, with soft edges and a subtle bas-relief texture that paint cannot replicate. Different colors bond permanently to the base because they are the same material. It demands a steady hand and a consistently wet base — a spray bottle of water is your best friend here.
Best for: Fine artists and illustrators exploring paper as a medium rather than a support.
19. Japanese Nagashizuki Sheet Formation : The technique behind the world’s strongest paper
What it is: A traditional washi method where pulp is poured over the mould in successive passes, using a viscous formation aid called neri.
Category: Traditional technique
Why it stands out: Nagashizuki lets a papermaker build a strong, even sheet from long kozo fibers that would clump in a Western-style dip. The neri — traditionally made from tororo aoi root — slows drainage so fibers align rather than bunch. It has a steep learning curve requiring rhythm and timing, but the result is paper of extraordinary strength and beauty.
Best for: Experienced makers ready to study washi seriously, or anyone who has watched a Japanese papermaking video and wanted to try it.
Bonus Mentions
Craft Store Papermaking Aisles : Where to handle felts and moulds before buying
What it is: Physical craft retailers that stock starter kits, felts, and pigments.
Why it stands out: Feeling a felt’s thickness or a mould’s mesh in person prevents a lot of online guesswork. Availability varies by store, so call ahead.
Best for: Beginners who want tools today rather than next week.
Etsy Papermaking Suppliers : Small-batch fiber and pre-beaten pulp
What it is: Independent sellers offering kozo, abaca, cotton linter, and formation aids in small quantities.
Why it stands out: You can buy exactly enough fiber for one project instead of a wholesale bale, and many sellers share preparation notes.
Best for: Testing unfamiliar fibers before committing to bulk.
Papermaking Video Tutorials : Watching the pour-and-couch rhythm in real time
What it is: Free demonstrations of sheet formation, pressing, and drying.
Why it stands out: Timing and hand motion are hard to learn from text; seeing a full pull answers questions a diagram cannot.
Best for: Visual learners preparing for their first batch.
Online Craft Communities : Troubleshooting from people who have made the same mistake
What it is: Forums and subreddits where papermakers post results and ask for diagnosis.
Why it stands out: A photo of a torn sheet usually gets a precise answer within hours — mold growth, poor couching, or short fiber.
Best for: Solving a specific recurring problem fast.
Library Conservation Resources : Reference standards for archival paper
What it is: Publicly available guidance on pH, fiber choice, and longevity from conservation institutions.
Why it stands out: If your paper needs to last decades, these references explain why cotton and kozo outperform recycled stock.
Best for: Bookbinders and anyone making keepsake documents.
The Quiet Joy of a Sheet You Made Yourself
Hand papermaking rewards the curious more than the precise. You do not need a studio — a blender, a plastic tray, a picture frame with window screen, and a stack of towels will get you through your first ten sheets. What changes as you go is your understanding: why long fibers make strong paper, why restraint drying keeps a sheet flat, why a drop of formation aid transforms an even pull. Each of those small insights is a door into the next technique on this list. Start with recycled office paper, make your mistakes cheaply, and save the kozo for when your hands know the rhythm. The first sheet you pull that dries flat, smooth, and genuinely yours is a small, satisfying milestone — and it usually arrives sooner than expected.
Which technique on this list are you trying first — or do you already have a papermaking trick that deserves a spot here? Share it in the comments; the best additions to this list usually come from other makers.