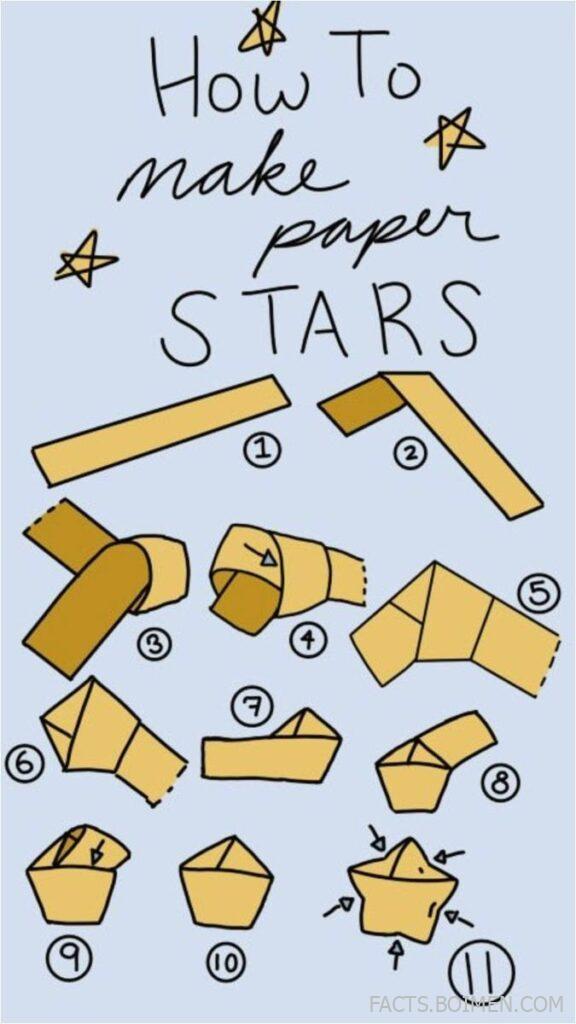
A tiny strip of paper does not look particularly exciting. Fold it the right way, though, and it can turn into a surprisingly neat little star.
Paper stars are inexpensive, satisfying to make, and useful for everything from handmade cards and gift wrapping to jars filled with colorful stars. The best part is that you do not need special craft equipment. A strip of paper, a pair of scissors, and a few careful folds are enough.
This guide walks through the complete process, including the small details that make the difference between a flat, uneven shape and a crisp three-dimensional paper star.
Table of Contents- Why Paper Stars Are Such a Satisfying Little Craft
- 1. Choose Your Paper
- 2. Cut a Long Paper Strip
- 3. Make the First Loop
- 4. Form a Small Knot
- 5. Flatten the Knot
- 6. Fold Away the Short End
- 7. Start Wrapping the Long Strip
- 8. Follow the Pentagon Edges
- 9. Tuck in the Remaining Paper
- 10. Check the Pentagon Shape
- 11. Pinch the First Side
- 12. Pinch the Remaining Sides
- 13. Shape the Five Points
- 14. Fix an Uneven Star
- 15. Turn Your Stars Into Something Beautiful
- Bonus Mention: Colored Paper
- Bonus Mention: Old Book Pages
- Bonus Mention: Leftover Gift Wrap
- Bonus Mention: Paper Star Jar
- From One Paper Strip to a Tiny Star
Why This Tiny Paper Craft Is More Addictive Than It Looks
Paper stars have an unusual advantage over many DIY projects: the materials are almost free, the finished objects are tiny, and once you understand the folding pattern you can make them repeatedly.
The familiar version is often called a lucky paper star. Instead of cutting a star shape directly from a sheet, you create a small pentagon from a long strip of paper, wrap the strip around that shape, and then gently push its sides inward. That final step creates the raised points.
The first star may take several attempts. After you understand how tightly to fold and where to apply pressure, however, the process becomes much faster.
1. Choose Your Paper : Start With Something Easy to Fold
What it is:
The foundation of your paper star. Ordinary printer paper is perfectly suitable while learning.
Category:
Materials and preparation
Why it stands out:
- Thin paper folds more cleanly than heavy cardstock.
- It is easier to pinch into a three-dimensional star.
- Practice paper costs almost nothing.
Best for:
Beginners making their first few stars.
2. Cut a Long Paper Strip : Get the Proportions Right
What it is:
A long, narrow strip cut from your chosen sheet of paper.
Category:
Preparation
Why it stands out:
- A consistent width produces cleaner edges.
- A sufficiently long strip gives the star enough layers to hold its shape.
- You can experiment with different widths to create smaller or larger stars.
Best for:
Creating an even base before folding begins.
3. Make the First Loop : Begin the Star’s Hidden Structure
What it is:
Take one end of the strip and bend it around to create a loose loop, leaving a short tail on one side.
Category:
Initial folding
Why it stands out:
- This loop creates the structure needed for the pentagon.
- Keeping it loose initially makes the next step easier.
- A short tail wastes less paper.
Best for:
Setting up the basic star shape.
4. Form a Small Knot : The Clever Fold That Makes Everything Work
What it is:
Pass the short end through the loop, almost as though you were tying a very gentle knot in the paper.
Category:
Structural folding
Why it stands out:
- The knot naturally begins forming five sides.
- It eliminates the need to measure individual angles.
- It becomes the center of the finished star.
Best for:
Creating the pentagonal foundation.
5. Flatten the Knot : Reveal the Pentagon
What it is:
Carefully tighten the paper knot without crushing it, then flatten it between your fingers.
Category:
Shape formation
Why it stands out:
- The seemingly messy knot suddenly becomes a recognizable pentagon.
- A neat pentagon produces more symmetrical star points later.
- This is the stage where inaccurate folds can still be corrected easily.
Best for:
Building a clean five-sided base.
6. Fold Away the Short End : Clean Up the Base
What it is:
Fold the small remaining tail along the edge of the pentagon. If necessary, tuck it beneath an existing layer.
Category:
Paper management
Why it stands out:
- Prevents loose paper from showing on the finished star.
- Keeps the pentagon compact.
- Makes the long strip easier to wrap.
Best for:
Getting a tidy result without glue.
7. Start Wrapping the Long Strip : Let the Pentagon Guide You
What it is:
Fold the long portion of the strip over the pentagon, following the natural direction created by its edges.
Category:
Wrapping
Why it stands out:
- You do not need to calculate where each fold belongs.
- The pentagon acts as a folding guide.
- Each wrap strengthens the star.
Best for:
Building enough thickness for the star to puff up later.
8. Follow the Pentagon Edges : Keep Wrapping Without Forcing It
What it is:
Continue wrapping the strip around the pentagon. Each fold should naturally sit against another edge.
Category:
Repeated folding
Why it stands out:
- The pattern becomes almost automatic after a few folds.
- Even tension helps maintain symmetry.
- Multiple layers create a stronger three-dimensional star.
Best for:
Anyone who wants crisp, consistent stars.
9. Tuck in the Remaining Paper : Lock Everything Together
What it is:
When the strip becomes too short for another complete wrap, slide the remaining end underneath the nearest overlapping paper layer.
Category:
Finishing fold
Why it stands out:
- No tape is normally necessary.
- No glue is normally necessary.
- The tucked end keeps the wrapped pentagon together.
Best for:
A clean handmade finish.
10. Check the Pentagon Shape : Do This Before You Start Pinching
What it is:
Inspect the wrapped shape and make sure you can clearly identify five sides.
Category:
Quality check
Why it stands out:
- Uneven wrapping is easier to correct now.
- A balanced pentagon makes the final star more symmetrical.
- The paper should be secure but not crushed completely flat.
Best for:
Avoiding one of the most common beginner mistakes.
11. Pinch the First Side : Watch the Star Begin to Appear
What it is:
Hold the pentagon gently and use a fingernail or fingertip to press inward at the center of one edge.
Category:
Three-dimensional shaping
Why it stands out:
- The indentation pushes the neighboring corners outward.
- The flat pentagon starts transforming into a star.
- Only gentle pressure is required.
Best for:
Creating the first visible star point.
12. Pinch the Remaining Sides : The Five-Point Transformation
What it is:
Rotate the pentagon and repeat the indentation on each of its remaining sides.
Category:
Shaping
Why it stands out:
- Each indentation creates more definition.
- The center begins to puff outward.
- Five distinct points gradually emerge.
Best for:
Turning the folded pentagon into the recognizable lucky-star shape.
13. Shape the Five Points : Small Adjustments Make a Big Difference
What it is:
Rotate the finished star and gently refine each indentation until the five points look balanced.
Category:
Final shaping
Why it stands out:
- You can correct slightly uneven points.
- Gentle shaping gives the center more dimension.
- It produces the polished appearance associated with paper lucky stars.
Best for:
Making handmade stars look cleaner and more consistent.
14. Fix an Uneven Star : Don’t Throw Away Your First Attempts
What it is:
A quick troubleshooting stage for stars that remain flat, collapse, or develop uneven points.
Category:
Troubleshooting
Why it stands out:
- If the star stays flat, the paper may have been wrapped too tightly.
- If a point looks small, gently reshape the two neighboring indentations.
- If the star collapses easily, try a slightly sturdier paper strip.
- If the pentagon is distorted, concentrate on making the initial knot cleaner next time.
Best for:
Beginners whose first star does not look like the picture.
15. Turn Your Stars Into Something Beautiful : Don’t Stop at Just One
What it is:
Once you understand the technique, make multiple stars and use them as miniature decorations.
Category:
Craft ideas
Why it stands out:
- Fill a transparent jar with stars in different colors.
- Add them to handmade cards.
- Use them as lightweight gift-box decorations.
- Create garlands by carefully threading multiple stars.
- Combine different sizes for table decorations.
Best for:
Turning a five-minute paper craft into a larger DIY project.
A Few Materials You Probably Already Have at Home
Colored Paper : The Simplest Upgrade
What it is:
Ordinary lightweight craft paper in several colors.
Category:
Alternative materials
Why it stands out:
- Creates colorful collections without additional decoration.
- Lets you coordinate stars for holidays, gifts, or room decor.
Best for:
Colorful star jars and decorative displays.
Old Book Pages : A Surprisingly Pretty Recycled Version
What it is:
Thin strips cut from unwanted or damaged book pages that you would otherwise recycle.
Category:
Upcycled crafts
Why it stands out:
- Printed text creates a distinctive pattern on every star.
- The thin paper is generally easy to fold.
Best for:
Vintage-looking decorations and recycled-paper projects.
Leftover Gift Wrap : Give Scraps a Second Life
What it is:
Narrow pieces of lightweight wrapping paper left after wrapping presents.
Category:
Recycled craft materials
Why it stands out:
- Patterns can make every star look different.
- It turns otherwise unusable scraps into decorations.
Best for:
Christmas, birthdays, and gift-box decorations.
Paper Star Jar : The Project That Makes You Want to Create 100 More
What it is:
A clear jar filled gradually with handmade paper stars.
Category:
DIY decoration
Why it stands out:
- Even imperfect individual stars look impressive when grouped together.
- You can mix colors, patterns, and sizes.
- Each star can represent a memory, wish, goal, or message.
Best for:
Personal gifts, desk decorations, and keepsake projects.
The Moment a Flat Pentagon Suddenly Becomes a Star
The most satisfying part of this craft is not actually the folding. It is the final few seconds when you press those five edges and a simple paper pentagon suddenly develops five raised points.
If your first attempt looks slightly crooked, keep it. Paper stars become dramatically easier once your fingers learn how much tension to use when wrapping and how much pressure to apply when shaping the points.
After a few attempts, you can experiment with thinner strips, patterned paper, different sizes, and entire collections of stars. What begins with one scrap of paper can quickly turn into a jar full of tiny handmade decorations.