Advertisements
If you want a neat, polished, and professional-looking yard, nothing beats a concrete curb lawn edging. Not only does it keep grass, mulch, and gravel where they belong, but it also adds long-term durability and curb appeal.
The best part? You don’t have to hire a landscaper. With the right tools and a little effort, you can create DIY concrete curbing that looks like it came straight out of a design magazine.
Why Choose Concrete Curbing for Lawn Edging?
When it comes to edging, homeowners usually consider plastic, metal, or stone borders. So why concrete?
- Durability: Concrete lasts for decades when properly installed.
- Low Maintenance: No shifting, warping, or fading like other edging materials.
- Customizable: You can shape it into curves, patterns, or straight lines.
- Aesthetic Appeal: Stamped or colored concrete can mimic stone or brick.
- Cost-Effective: DIY concrete edging is much cheaper than professional installation.
In short, concrete is the king of long-lasting lawn borders.
Tools & Materials You’ll Need
Before starting your DIY project, gather the essentials:
- Shovel
- Garden hose or rope (for layout)
- Measuring tape
- Wooden stakes & string
- Level
- Concrete mix (ready-mix bags work well)
- Wheelbarrow & mixing tool
- Trowel & concrete float
- Edging form (wood planks or plastic edging forms)
- Rubber mallet
- Protective gear (gloves, safety glasses)
Optional but useful:
- Concrete coloring powder or stain
- Stamps for decorative patterns
- Sealer for weather protection
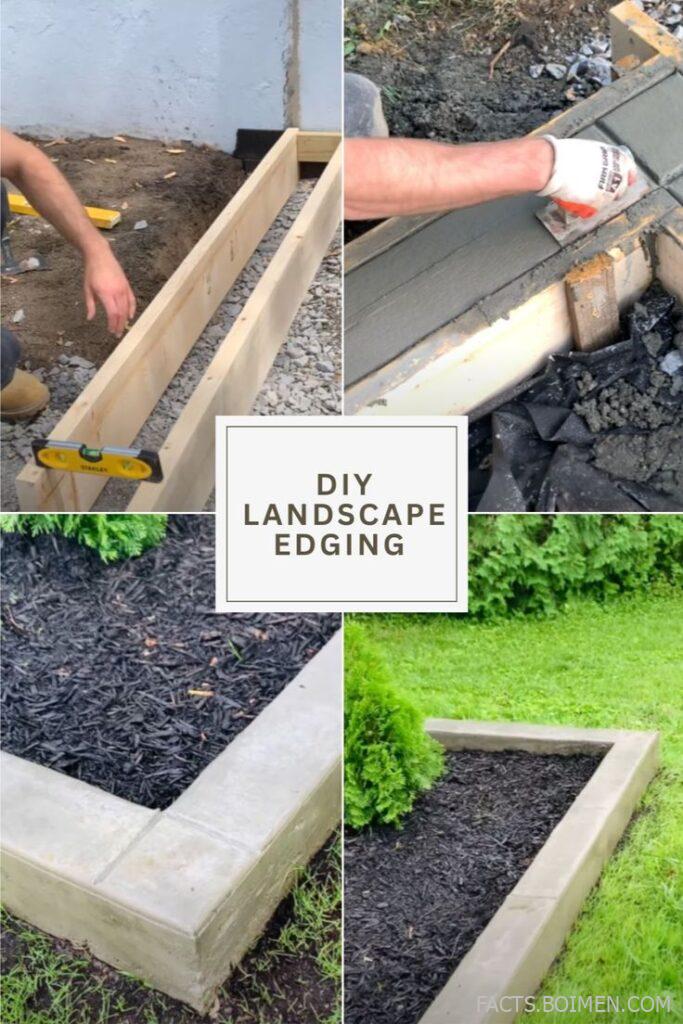
Step-by-Step Guide: DIY Concrete Lawn Curb
Here’s the process to create strong, attractive edging for your lawn.
Step 1: Plan Your Edging Line
- Use a garden hose or rope to outline the shape of your edging.
- Curves add elegance, while straight lines give a modern look.
- Mark the path with spray paint or chalk.
Step 2: Dig a Trench
- Dig a trench along the marked line.
- The trench should be about 4–6 inches deep and 6 inches wide.
- Ensure the trench is even for consistent curb height.
Step 3: Build the Form
- Use wooden boards or plastic edging forms to create the mold.
- Secure the forms with stakes driven into the ground.
- Double-check that the forms are level—this ensures a professional finish.
Step 4: Mix the Concrete
- In a wheelbarrow, mix concrete with water according to bag instructions.
- The mixture should be thick but workable, like peanut butter.
- Add coloring powder if you want a tinted curb.
Step 5: Pour the Concrete
- Carefully pour the concrete into the form.
- Use a shovel to spread it evenly.
- Tap the sides of the form with a mallet to remove air bubbles.
Step 6: Smooth & Shape
- Use a trowel to smooth the top.
- For a rounded edge, run an edging tool along the top.
- If stamping, press designs into the wet concrete at this stage.
Step 7: Cure the Concrete
- Allow the curb to dry slowly. Cover it with plastic if it’s hot and sunny to prevent cracks.
- Let it cure for at least 24–48 hours before removing forms.
Step 8: Seal & Protect
- Apply a concrete sealer to protect against moisture, stains, and weather.
- This keeps your edging looking fresh and strong for years.
Design Ideas for DIY Concrete Curbing
Concrete doesn’t have to be plain gray! Here are some creative ways to customize:
- Stamped Concrete: Mimic brick, cobblestone, or slate.
- Colored Concrete: Add earthy tones (brown, red, tan) for a natural look.
- Curved Borders: Flowing edges look great around flower beds.
- Two-Tone Finish: Paint the top edge a different color for contrast.
- Exposed Aggregate: Add small stones to the mix for texture.
With a little creativity, your curb can be both functional and stylish.
Cost of DIY vs. Professional Installation
- DIY Concrete Curb: $2–$3 per linear foot (mainly materials).
- Professional Installation: $8–$15 per linear foot.
By doing it yourself, you can save hundreds—sometimes thousands—depending on the size of your yard.
Maintenance Tips for Concrete Lawn Edging
To keep your edging looking great:
- Seal annually: Protects against cracks and stains.
- Clean occasionally: Power wash to remove dirt and moss.
- Check for cracks: Fill small cracks with patch mix before they spread.
- Avoid heavy impacts: Don’t hit the edging with mowers or trimmers.
With proper care, your edging can last 20+ years.
Final Thoughts
Concrete curbing is one of the best choices for lawn edging—strong, stylish, and customizable. With a DIY approach, you don’t need to break the bank to get a professional look.
Whether you want straight modern lines, curved garden borders, or decorative stamped patterns, a DIY concrete curb gives your yard a polished upgrade.
So roll up your sleeves, grab some concrete mix, and start edging—your lawn will thank you! 🌿💪
Advertisements