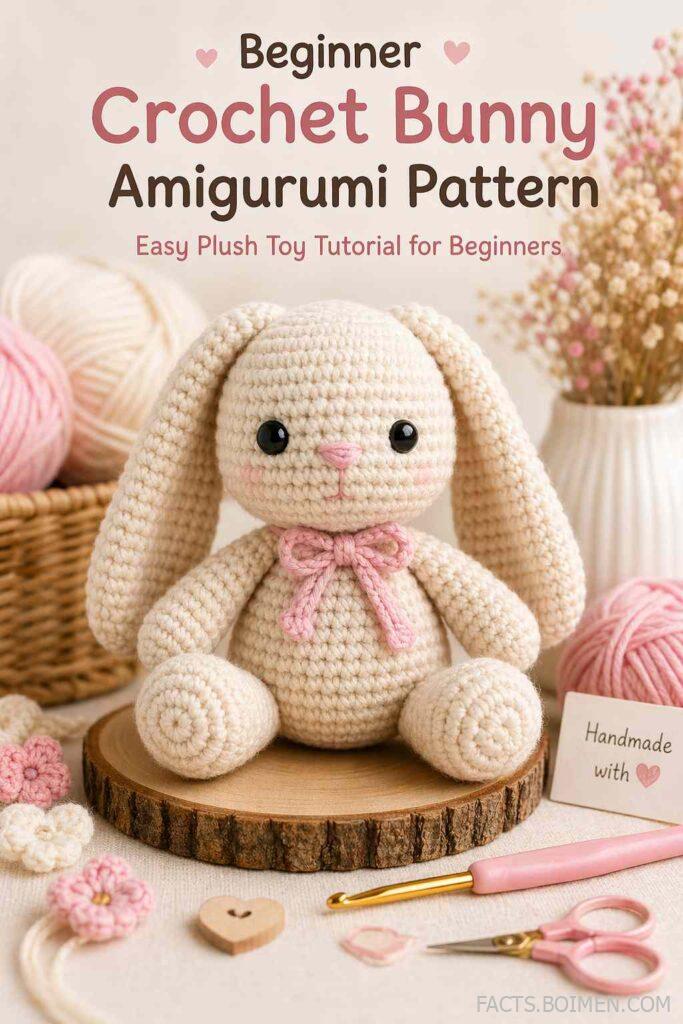
Creating your first crochet bunny amigurumi is one of the most rewarding beginner-friendly projects in the crochet world. A soft plush bunny is not only adorable, but it also makes a perfect handmade gift for babies, children, Easter baskets, nursery décor, or even as a cute desk companion.
If you are new to crochet and looking for an easy project that helps you practice basic stitches while creating something beautiful, this beginner crochet bunny amigurumi pattern is the perfect place to start.
In this complete guide, you will learn how to crochet a bunny plush toy step by step, what materials you need, beginner tips, and how to make your finished bunny look professionally handmade.
Why Crochet a Bunny Amigurumi?
Amigurumi is the Japanese art of crocheting small stuffed yarn creatures. Bunny patterns are especially popular because they are soft, cute, and highly customizable.
A beginner crochet bunny is ideal because:
- It uses simple stitches
- It helps improve tension control
- It teaches shaping techniques
- It requires minimal materials
- It can be completed quickly
- It makes a wonderful handmade gift
Even if you have never made an amigurumi plush before, this project is very beginner-friendly.
Materials You Need
Before starting your crochet bunny plush toy, gather the following supplies:
Yarn
Choose soft yarn like:
- Cotton yarn
- Velvet yarn
- Chenille yarn
- Plush blanket yarn
- Acrylic yarn for beginners
For a soft stuffed bunny look, plush yarn works beautifully.
Popular colors include:
- White
- Cream
- Beige
- Light gray
- Pink
- Pastel blue
- Lavender
Crochet Hook
Use the hook size recommended for your yarn, usually:
- 3.5 mm
- 4.0 mm
- 4.5 mm
- 5.0 mm for plush yarn
Smaller hooks create tighter stitches so stuffing does not show through.
Other Supplies
You will also need:
- Polyester fiberfill stuffing
- Safety eyes
- Yarn needle
- Stitch marker
- Scissors
- Pink embroidery thread for the nose
- Optional ribbon or bow for decoration
Basic Crochet Stitches Used
This easy bunny amigurumi pattern mainly uses beginner stitches:
Magic Ring
Used to start the head and body neatly.
Single Crochet (SC)
The most important stitch in amigurumi.
Increase (INC)
Two single crochets in one stitch.
Decrease (DEC)
Combining two stitches into one.
Slip Stitch (SL ST)
Used for finishing parts.
Chain (CH)
Helpful for ears and decorative details.
If you know these stitches, you are ready to begin.
Step-by-Step Beginner Crochet Bunny Pattern
This is a simple plush toy tutorial using basic shaping.
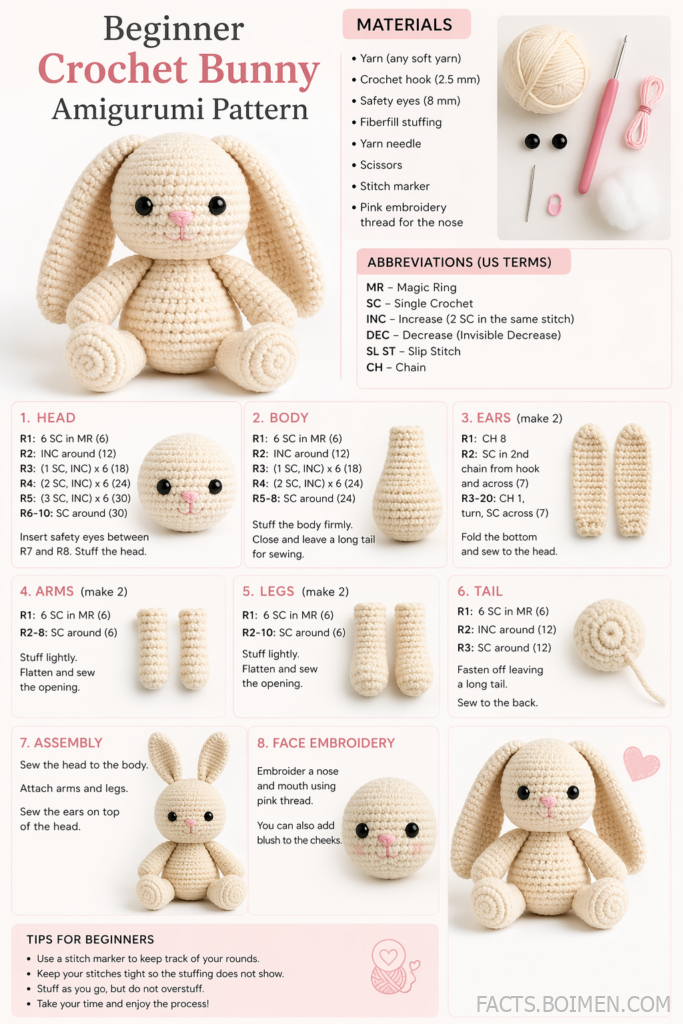
Step 1: Crochet the Head
Start with a magic ring.
Round 1
6 single crochet into magic ring
Round 2
Increase in each stitch around (12)
Round 3
1 SC, 1 INC repeat around (18)
Round 4
2 SC, 1 INC repeat around (24)
Round 5
3 SC, 1 INC repeat around (30)
Round 6–10
Single crochet around
Add safety eyes between rounds 7 and 8.
Begin stuffing lightly.
Step 2: Crochet the Body
Round 1
Magic ring with 6 SC
Round 2
Increase around (12)
Round 3
1 SC, 1 INC (18)
Round 4
2 SC, 1 INC (24)
Round 5–8
SC around
Stuff firmly and close.
Sew the body to the head carefully.
Step 3: Make the Bunny Ears
Create two long ears.
Row 1
Chain 8
Row 2
Single crochet back along the chain
Repeat rows for desired ear length.
Slightly fold the bottom and sew to the head.
Long floppy ears create the classic bunny look.
Step 4: Crochet the Arms and Legs
Make small tubes using:
- Magic ring
- 6 SC
- A few rounds of SC
Stuff lightly and attach to the body.
Keep proportions small for a cute plush appearance.
Step 5: Add the Tail
Create a small pom-pom tail or crochet a tiny round ball.
Attach to the back of the bunny body.
This small detail makes a huge difference.
Step 6: Embroider the Face
Use pink embroidery thread for:
- Small triangle nose
- Tiny mouth
- Optional blush cheeks
Facial details give your bunny personality.
Beginner Tips for Better Results
If this is your first amigurumi bunny, these tips help a lot:
Use a Stitch Marker
It is easy to lose your place in spiral rounds.
Keep Tight Tension
Loose stitches make stuffing visible.
Stuff Gradually
Do not overstuff too early.
Sew Slowly
Take time attaching ears and limbs evenly.
Start Simple
Do not worry about perfection on your first bunny.
Every bunny gets better with practice.
Customization Ideas
One of the best parts of crochet bunny patterns is personalization.
Try adding:
- A bow tie
- A flower crown
- A tiny sweater
- Overalls
- A baby blanket
- Carrot accessory
- Easter basket
- Sleepy embroidered eyes
- Personalized colors
These details make your handmade bunny truly unique.
Best Occasions for Crochet Bunny Gifts
A crochet bunny plush toy is perfect for:
- Baby showers
- Easter gifts
- Birthday presents
- Nursery decoration
- Valentine gifts
- Handmade holiday gifts
- Craft fair bestsellers
- Kids room décor
Handmade plush toys feel more meaningful than store-bought gifts.
- beginner crochet bunny pattern
- crochet plush bunny free pattern
- crochet rabbit stuffed toy pattern
- bunny crochet pattern for beginners
- Easter bunny crochet ideas
- handmade plush bunny tutorial
Using these keywords naturally helps improve search visibility and Pinterest traffic.
Final Thoughts
A beginner crochet bunny amigurumi pattern is one of the best first plush toy projects for new crocheters. It is simple, cute, practical, and highly giftable.
With just basic stitches, soft yarn, and a little patience, you can create a beautiful handmade bunny that feels both professional and personal.
Whether you are making it for yourself, for a child, or as a special gift, this easy crochet bunny plush tutorial is a project you will want to make again and again.
Once you finish your first bunny, you may discover that amigurumi becomes your new favorite crochet obsession.