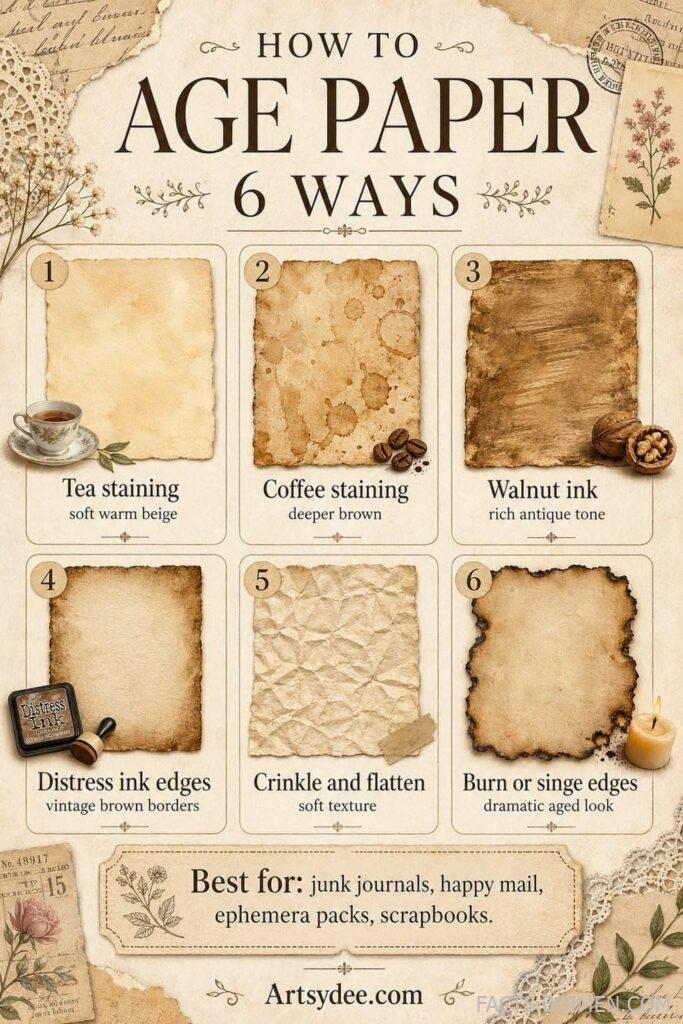
There’s a particular magic in pulling a sheet of paper out of a drawer and having it look like it survived a century in an attic. Aged paper is the backbone of junk journals, scrapbooks, happy mail, and vintage-style crafts — and you don’t need a single specialty product to make it. A tea bag, a candle, a bottle of coffee, and a crumpled fist are often all it takes. Below are sixteen methods for aging paper at home, from the gentlest wash to the most dramatic charred edge, each with a genuinely different finish. Pick one, or layer a few together for a finish that looks like it took decades.
Table of Contents(Click to Toggle)
- Why Aging Paper Is the Heart of Junk Journaling
- 16 Ways to Age Paper for Junk Journals and Ephemera
- 1. Tea Staining
- 2. Coffee Staining
- 3. Walnut Ink Wash
- 4. Distress Ink Edges
- 5. Crinkle and Flatten
- 6. Burning the Edges
- 7. Baking Soda and Heat
- 8. Rubbing With Dirt or Cocoa Powder
- 9. Sun Fading
- 10. Vinegar and Steel Wool Stain
- 11. Soy Sauce and Water Wash
- 12. Acrylic Glaze and Antiquing Medium
- 13. Sandpaper and Edge Wear
- 14. Wax Seal and Candle Soot
- 15. Layered Mixed-Media Aging
- 16. Digital Aging and Printing
- Bonus Mentions
- The Best Aged Paper Comes From the Kitchen
Why Aging Paper Is the Heart of Junk Journaling
A junk journal lives or dies on texture. New, bright-white printer paper reads as modern and flat, while a page that has been stained, crinkled, and darkened at the edges instantly tells a story before a single word is written on it. That’s why aged paper is the single most requested ephemera skill in the journaling community — it’s the difference between a notebook and a keepsake.
The good news is that aging paper is almost absurdly accessible. Every method below uses items you likely already own: tea, coffee, spices, ink pads, sandpaper, a candle. None require a craft-store run, and most take under ten minutes of hands-on time. What separates the methods is the finish — a tea wash gives you soft, mottled warmth, while a walnut ink wash delivers a deep, uniform antique tone. Learning two or three of these gives you an entire vocabulary of vintage looks for your journals, tags, envelopes, and happy mail.
16 Ways to Age Paper for Junk Journals and Ephemera
1. Tea Staining : The Gentle, Mottled Warm Wash
What it is: Brewing strong black tea and brushing or dipping paper into the liquid to give it a soft, warm, uneven tan.
Category: Liquid staining
Why it stands out: Tea is the most forgiving method for beginners because the color builds slowly and the tannins create natural blotches that look genuinely old. Two or three tea bags steeped in a cup of hot water is enough for a dozen sheets.
Best for: Journal pages, book pages, and envelopes where you want a subtle, romantic finish rather than a heavy stain.
2. Coffee Staining : A Deeper, Richer Brown
What it is: Using leftover brewed coffee — or instant coffee dissolved in water — as a dye bath for paper.
Category: Liquid staining
Why it stands out: Coffee gives a darker, more saturated brown than tea, and the grounds can be pressed onto wet paper for speckled texture. Instant coffee is especially useful because you can control the concentration precisely.
Best for: Tags, kraft-style envelopes, and pages that need a bold antique look without buying dye.
3. Walnut Ink Wash : The Deep Antique Tone
What it is: A concentrated walnut ink — often sold as crystals or a liquid — diluted with water and brushed over paper for a rich, even sepia.
Category: Ink staining
Why it stands out: Walnut ink is the closest thing to a true antique finish. It’s more controllable than kitchen stains, dries evenly, and can be layered for depth. A small jar goes a very long way.
Best for: Faux vintage documents, postcards, and pages that need a uniform, museum-style sepia.
4. Distress Ink Edges : The Quick Edge Darkening
What it is: Dragging a foam-blended distress ink pad along the edges of a page to create a darkened, worn border.
Category: Dry pigment
Why it stands out: This is the fastest method on the list — under a minute per sheet — and it’s completely dry, so no drying time and no warping. The ink pad’s color range lets you match any journal palette.
Best for: Tags, die cuts, and layered pages where you want instant depth along the edges without wetting the paper.
5. Crinkle and Flatten : The Worn, Handled Texture
What it is: Crumpling paper into a tight ball, then flattening it out and optionally dragging an ink pad over the raised creases.
Category: Texture
Why it stands out: No liquid, no dye, no mess — just your hands. The creases catch light and ink, instantly making paper look like it’s been folded in a pocket for years. Combine it with a tea wash for a doubly convincing finish.
Best for: Journal pages, letters, and any paper where a soft, handled texture matters more than color.
6. Burning the Edges : The Dramatic Charred Look
What it is: Carefully singeing the edges of paper with a lighter or candle to create a charred, irregular border.
Category: Heat
Why it stands out: Nothing else produces that scorched, dramatic edge. Work over a metal tray, keep a bowl of water nearby, and burn a few millimeters at a time for control. It’s the boldest method here — and the one that turns a plain page into a treasure map.
Best for: Faux maps, spell pages, and journal covers where a burned edge is the whole point.
7. Baking Soda and Heat : The Oven-Browned Paper
What it is: Lightly misting paper, dusting it with baking soda, and warming it in a low oven to brown the surface.
Category: Heat and chemistry
Why it stands out: This produces an all-over golden brown that looks like decades of oxidation. Keep the oven low and watch constantly — paper browns fast. It’s a favorite for making crisp new paper look like old book stock.
Best for: Book pages, sheet music, and large batches where an even, all-over tone is wanted.
8. Rubbing With Dirt or Cocoa Powder : The Dusty, Grungy Finish
What it is: Dusting cocoa powder, cinnamon, or fine dry dirt over paper and rubbing it into the fibers with a soft cloth.
Category: Dry pigment
Why it stands out: It’s dry, fast, and gives a soft, dusty patina that liquid stains can’t replicate. Cocoa powder is especially useful because it’s fine, smells pleasant, and brushes away easily if you overdo it. A little goes a long way.
Best for: Grungy journal pages, tags, and any paper where you want a soft, dusty, handled look.
9. Sun Fading : The Slow, Natural Yellowing
What it is: Placing paper in direct sunlight for hours or days to let UV light naturally yellow and fade it.
Category: Light
Why it stands out: It’s completely hands-off — you set it out and forget it. Sun fading gives an authentic, uneven yellowing that looks like paper left on a windowsill for years. It’s slow, but it’s the most realistic of all the methods.
Best for: Large batches of paper you can leave outdoors, and anyone who prefers a no-mess approach.
10. Vinegar and Steel Wool Stain : The Rusty, Weathered Tone
What it is: Soaking steel wool in vinegar for a few days to create a homemade iron stain, then brushing it onto paper.
Category: Chemistry
Why it stands out: The resulting stain reacts with the paper’s fibers to create a genuine aged, weathered tone with subtle gray-brown variation. It’s the closest thing to real oxidation you can make at home. Work in a ventilated space and test on scrap first.
Best for: Faux antique documents and pages that need an authentically weathered, uneven look.
11. Soy Sauce and Water Wash : The Fast, Golden Stain
What it is: Diluting a few drops of soy sauce in water and brushing it over paper for a quick golden-brown wash.
Category: Liquid staining
Why it stands out: It’s the fastest liquid stain on this list — a tiny amount colors a whole sheet, and the result is a warm golden tone that dries quickly. It’s a great emergency technique when you need aged paper in five minutes.
Best for: Last-minute tags and envelopes, and anyone who wants a quick stain without brewing tea.
12. Acrylic Glaze and Antiquing Medium : The Painterly Patina
What it is: Brushing a thin layer of acrylic glaze or antiquing medium over paper and wiping it back to leave color in the texture.
Category: Paint
Why it stands out: This is the technique furniture restorers use, and it translates perfectly to paper. The glaze settles into creases and edges, creating instant depth and a professional, finished look. It’s ideal for thicker paper and cardstock.
Best for: Journal covers, cardstock tags, and pages where you want a controlled, painterly antique finish.
13. Sandpaper and Edge Wear : The Thinned, Worn Edge
What it is: Lightly sanding the edges and corners of paper to thin and roughen them, mimicking years of handling.
Category: Abrasion
Why it stands out: Real old paper has soft, slightly frayed edges, and sandpaper recreates that instantly. Use a fine grit and light pressure — a few passes are enough. It pairs beautifully with a tea or coffee wash for a fully worn look.
Best for: Cardstock, tags, and any paper where the edges will be visible in the finished journal.
14. Wax Seal and Candle Soot : The Smoky, Sealed Finish
What it is: Holding paper briefly over a candle flame to collect soot, then sealing it with a wax seal for a vintage letter look.
Category: Heat and wax
Why it stands out: Soot gives a soft, smoky gray-brown haze that reads as genuinely old, and a wax seal turns a plain page into a keepsake letter. Keep the paper moving and well above the flame to avoid scorching.
Best for: Happy mail, faux letters, and journal covers where a sealed, smoky finish tells a story.
15. Layered Mixed-Media Aging : The Full Vintage Finish
What it is: Combining several methods — a tea wash, crinkling, edge ink, and a light sanding — into one layered finish.
Category: Combined technique
Why it stands out: Real old paper isn’t just stained; it’s stained, creased, worn, and darkened at the edges all at once. Layering methods is how you get a finish that fools the eye. Start with a wash, let it dry, crinkle, then ink the edges.
Best for: Hero pages, journal covers, and any piece that deserves the full antique treatment.
16. Digital Aging and Printing : The No-Mess Shortcut
What it is: Using free texture overlays or photo-editing tools to age a digital file, then printing it onto cream or kraft paper.
Category: Digital
Why it stands out: It’s completely mess-free and endlessly repeatable — perfect for printing a whole batch of matching tags or journal pages. You can dial in the exact stain color and texture, then print on textured paper for a convincing result.
Best for: Batch printing, printable ephemera, and anyone who wants aged paper without touching a tea bag.
Bonus Mentions
Crayola Watercolor Wash : A Soft, Tinted Base
A diluted watercolor wash in sepia or ochre gives a soft, even tint that’s easy to control and dries fast — a great first layer before inking edges.
Sharpie Edge Dots : Quick Faux Foxing
Dabbing a fine-tip brown marker along the edges creates instant foxing spots — those small age marks that make paper look genuinely old.
Scotch Tape Resist : Torn Edges Made Easy
Pressing tape along an edge and pulling it away creates a torn, fibrous edge that looks hand-torn — a favorite trick for faux vintage documents.
Michaels Kraft Paper : The Perfect Base
Starting with kraft or cream paper rather than bright white cuts your aging time in half — the base tone does half the work before you even begin.
The Best Aged Paper Comes From the Kitchen
None of these sixteen methods require a specialty purchase. The most convincing aged paper usually comes from a tea bag, a candle, and a crumpled fist — items already sitting in your kitchen. Start with tea staining or crinkle-and-flatten if you’re new, then layer in edge ink or a walnut wash as you get comfortable. The real secret is that aging paper is forgiving: blotches, uneven edges, and creases are the whole point, not mistakes to fix. Try one method this weekend, then combine two for a finish that looks like it took decades.
Which method are you trying first — the tea wash or the burned edge? Share your favorite aged-paper trick in the comments.