Fall is one of the most colorful and inspiring seasons of the year. With golden leaves, pumpkins, and the cozy feeling of autumn air, it’s no surprise that people love decorating their homes, classrooms, and gardens during this time. One of the most charming decorations you can create is a DIY fall tree. This project is fun, creative, and perfect for both adults and children.
In this guide, we’ll walk you through step-by-step instructions on how to make your own autumn tree decoration, what materials you’ll need, and some creative ideas to personalize it.
Why Make a DIY Fall Tree?
Decorating with a fall tree instantly brings the warmth of the season indoors. Unlike store-bought decorations, making one yourself allows for creativity, personalization, and even bonding time with family or students.
- Affordable: Most materials are inexpensive or already available at home.
- Customizable: You can choose the colors, size, and theme.
- Educational: Perfect for teaching children about the seasons, nature, and creativity.
- Eco-friendly: Many materials can be recycled, such as cardboard, paper, or fabric.
Materials You Will Need
Before you start, gather the following supplies (you can adjust depending on the style you want):
- A flower pot or container for the base.
- Pebbles, stones, or sand to keep the tree stable.
- A wooden stick, dowel, or cardboard tube for the trunk.
- Brown paper, felt, or paint to cover the trunk.
- Cardstock, colored paper, or felt sheets in fall shades (red, orange, yellow, brown) for leaves.
- Scissors and glue (or a hot glue gun for sturdier results).
- Optional decorations: paper squirrels, pumpkins, acorns, glitter, or fairy lights.
Step-by-Step Instructions
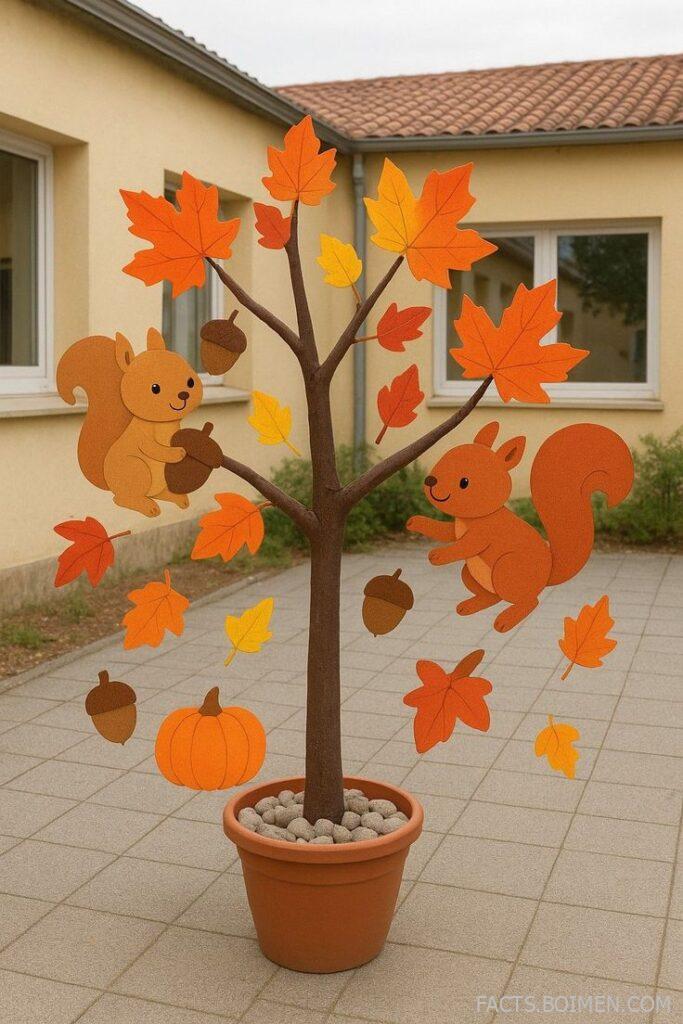
Step 1: Create the Tree Base
Choose a flower pot or small bucket as the foundation for your fall tree. Fill it with pebbles, sand, or small stones to make sure the base is heavy enough to hold the tree upright.
Step 2: Build the Trunk
Insert a sturdy stick, dowel, or cardboard tube into the center of the pot. This will serve as the trunk. Secure it tightly by pressing it into the stones or using glue. Wrap the trunk with brown paper or paint it to give it a realistic bark-like texture.
Step 3: Add Branches
For branches, you can attach smaller sticks, cardboard cutouts, or wire pieces to the trunk. Arrange them at different angles to give the tree a natural look. Cover them with the same brown material to match the trunk.
Step 4: Cut Out Leaves
Using colored paper or felt, cut out leaf shapes in different sizes and shades of orange, red, yellow, and brown. To make it more realistic, mix colors and even draw veins with markers.
Step 5: Attach the Leaves
Glue the leaves onto the branches. Place some closer to the trunk and others hanging at the edges to make the tree look full. You can also scatter extra leaves at the base of the pot to mimic fallen autumn leaves.
Step 6: Add Decorative Details
This is where you can get creative:
- Glue paper squirrels or acorns to the branches.
- Add a pumpkin cutout at the bottom.
- Use glitter or metallic paper to make some shiny leaves.
- Wrap small fairy lights around the tree for a magical touch.
Step 7: Finishing Touches
Step back and look at your tree. Adjust the leaves and decorations as needed until you’re happy with the final look.
Creative Variations
- Classroom Project: Teachers can create a large version on a bulletin board where students add their own leaves with names or drawings.
- Family Activity: Each family member can decorate a leaf and place it on the tree, creating a family memory tree.
- Holiday Transition: Use the same base tree and change decorations for winter (snowflakes), spring (flowers), or summer (green leaves).
Tips for Success
- Mix materials: Use both paper and felt for texture.
- Use strong glue: Hot glue works best for attaching heavier items like felt leaves or decorations.
- Keep balance: Spread decorations evenly so the tree doesn’t tip over.
- Reuse: Store your tree and bring it back each fall with updated decorations.
Benefits of DIY Fall Crafts
Crafting is not just about decoration—it also improves creativity, relaxation, and teamwork. Making a fall tree can:
- Reduce stress by focusing on a creative task.
- Teach kids fine motor skills and seasonal awareness.
- Add a personal touch to home or classroom decor.
Final Thoughts
A DIY fall tree decoration is more than just an autumn craft—it’s a way to bring the season’s warmth into your space while enjoying a fun and creative project. With simple materials and a bit of imagination, you can create a decoration that celebrates the beauty of fall.
Whether you’re making it for your home, classroom, or a festive event, this autumn tree will brighten up any space with its vibrant colors and playful charm.
So grab your scissors, gather your paper leaves, and start crafting—your perfect fall tree is just a few steps away.