Advertisements
When you look at a perfectly landscaped garden, it’s not just the plants or flowers that make it shine—it’s the details. And one of the biggest secrets landscapers don’t always share? Edging.
Garden edging is what separates an “average backyard” from a polished, magazine-worthy outdoor space. Professionals often charge hundreds (sometimes thousands) for edging designs, but you don’t need to spend that much. With the right know-how, you can bring those $500+ landscaping secrets into your own garden for a fraction of the cost.
Here are 7 garden edging ideas professional landscapers swear by—and how you can try them yourself.
1. Natural Stone Borders 🪨✨
Why pros love it:
Stone edging creates a timeless, elegant look that blends with any garden style. Landscapers often source local stones for an organic, natural finish.
How to DIY:
- Collect flat stones or purchase landscaping rocks.
- Dig a shallow trench along your border.
- Place the stones tightly together for a clean line.
Pro Secret: Use a mix of large and small stones for a natural, less “placed” look. Adding crushed gravel underneath helps with stability.
2. Metal Landscape Edging (Steel or Aluminum) ⚒️
Why pros love it:
Thin, sleek, and nearly invisible, metal edging is a landscaper’s trick for modern, sharp lines. It’s durable, flexible, and won’t shift over time.
How to DIY:
- Buy pre-bent steel or aluminum strips.
- Install using stakes or anchors.
- Bend gently for curves, or keep it straight for contemporary style.
Pro Secret: Pros often powder-coat edging in matte black or bronze for a luxury finish that makes grass and flower beds “pop.”
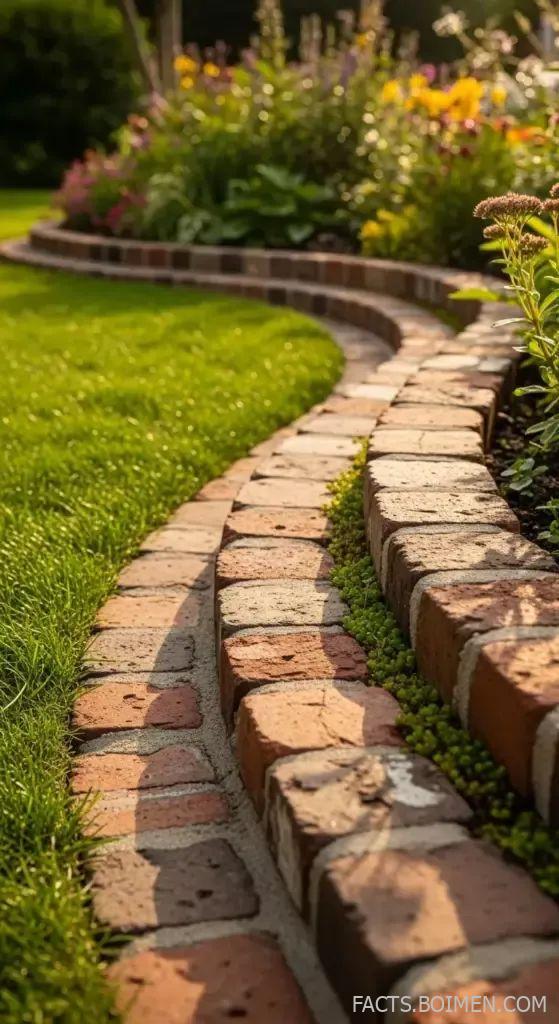
3. Brick or Paver Borders 🧱🌸
Why pros love it:
Bricks add a classic and structured look while staying budget-friendly. They’re easy to install, replace, and customize in patterns like herringbone or basket weave.
How to DIY:
- Lay bricks side by side, slightly sunk into the soil.
- Angle them vertically for more height or horizontally for a wider edge.
- Use sand or gravel underneath for stability.
Pro Secret: Professional landscapers sometimes alternate brick angles for visual interest—this instantly makes the edging look custom (and expensive).
4. Concrete Curbing 🏗️🌿
Why pros love it:
Concrete edging is long-lasting, customizable, and super clean-looking. Landscapers often charge $10–$15 per linear foot for this service—but you can DIY it for a fraction.
How to DIY:
- Dig a trench and place wooden or plastic forms.
- Mix and pour concrete.
- Smooth and shape with a trowel.
Pro Secret: Adding stains or stamped patterns can make your curb look like stone or brick at a much lower cost.
5. Wood & Timber Edging 🌲🪵
Why pros love it:
Wood offers a rustic, warm, and natural vibe—perfect for cottage gardens or pathways. Professionals often use pressure-treated wood for longevity.
How to DIY:
- Cut logs, sleepers, or reclaimed wood into equal lengths.
- Bury at least one-third of each piece for stability.
- Line them up vertically or horizontally.
Pro Secret: Pros burn the surface lightly with a torch (a Japanese technique called shou sugi ban) for a weatherproof, stylish charred finish.
6. Gravel or Pebble Trenches 🪨🌿
Why pros love it:
A gravel trench acts as both a visual border and a drainage solution. It’s subtle, low-maintenance, and adds texture.
How to DIY:
- Dig a shallow trench (3–6 inches wide).
- Line it with landscape fabric.
- Fill with decorative gravel, pebbles, or river rock.
Pro Secret: Mix different sizes and colors of stone for depth. Many landscapers add a hidden drainage pipe underneath to prevent water pooling.
7. Living Edging (Plants & Groundcovers) 🌱🌸
Why pros love it:
Instead of hard borders, some landscapers plant low-growing perennials or groundcovers that act as a natural “living” edge. It’s soft, beautiful, and eco-friendly.
How to DIY:
- Choose hardy groundcovers like creeping thyme, mondo grass, or ajuga.
- Plant in a single line along borders.
- Keep them trimmed to maintain shape.
Pro Secret: Pros combine living edging with hidden hard edging (like metal strips) underneath to prevent spreading into grass.
How Much Can You Save Doing It Yourself? 💰
- Professional edging installation: $500–$2,000+ depending on materials and length.
- DIY edging project: $50–$300 for materials.
By using professional secrets at home, you could save hundreds while still achieving that luxury landscaped look.
Tips for Professional-Looking Edging
- Keep it level: Uneven edging is the #1 DIY giveaway.
- Combine textures: Mix stone with plants or wood with gravel.
- Match your home’s style: Modern homes = sleek metal or concrete. Cottages = wood or brick.
- Maintain it: Trim grass regularly and refresh gravel/mulch yearly.
Final Thoughts
The truth is: edging is one of the biggest landscaping secrets professionals use to elevate a garden’s look. But now, those $500+ insider tricks are yours too.
Whether you choose stone, brick, concrete, or even living plants, a well-defined edge will transform your outdoor space into something polished, elegant, and straight out of a design magazine.
✨ The best part? You don’t need a pro—you just need a little inspiration and effort.
So grab your tools, pick your favorite edging idea, and give your garden the pro treatment it deserves. 🌿💎
Advertisements